
Planning for Your Kitchen or Bath Remodel
A successful remodel project begins with detailed project planning! Our experts provide residential and commercial remodeling services that include free consultation and design, making sure your kitchen or bath improvements bring your vision to life.
Measuring your kitchen, bath or any other room in your home is easy, and you don’t have to be a rocket scientist to do it! Please be as precise as possible when you measure your room. This will help avoid any changes that may cause you to run into extra costs.
- Do not include existing cabinetry or furniture that you do not wish to keep in your measurement.
- For doorways with doors, draw the doorway according to the way the direction of the door swings. (See above drawing.)
- Show all dimensions in inches. We don’t want 58” to be mistaken for 5’8”.
- If your Dream Kitchen, Bath or other rooms will be an addition or new construction, you may be able to work from your architect or contractor’s prints.
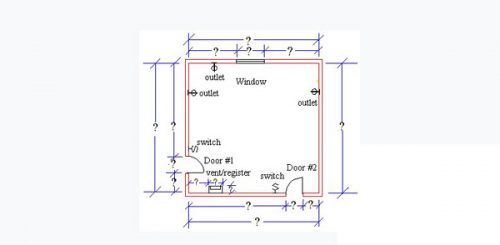
How To Measure
- The tools you will need: notepad or scratch paper, graph paper, pencil, eraser, measuring tape, and a calculator.
- Make sure all notes and drawings are done in pencil. This will allow you to easily make changes.
- Start by drawing a rough draft of the shape of the room on scratch paper or notepad. Draw in doors, windows, and breaks in the wall. Include radiators, pipes, sink plumbing, etc. Do not worry about drawing to scale; this drawing will be used to record the rooms’ measurements.
- Start from the left corner to the first wall, window or door. Continue clockwise around the room until each window, door and wall has been measured.
- When measuring the windows/doors, the casing (trim) is usually considered part of the window/door. Measure from outside the window/door on the left, then measure to the outside on the right. If you plan on replacing the casing (trim), measure the inside of the window/door from left to right and make a note of the width of the casing you plan on installing.
- For windows, measure from the floor to the bottom of the window casing, to the top of the window casing then to the ceiling.
- If a soffit/bulkhead is included in your kitchen; measure the height from the floor to the bottom. Measure height from bottom to ceiling. Measure depth from front to back. Measure the full length of the soffit at the back (from left to right corner and from right to left corner).
- Measure from the floor to the ceiling. In older homes you may want to take measurements in various locations. Ceiling heights may vary even a few inches in the same room.
- Make a note of the location and size of all the electrical outlets, light switches and lighting fixtures.
- Measure the location of all plumbing and gas connections.
- Measure the location of all ducts, vents or radiators.
- Measure full length of each wall.
- Double check your measurements. Add the measurements from wall to window/door to wall, and compare them to the wall to wall measurement.
- Compare your measurements from one wall to the opposite wall.
- Using the scale of 1/2”equals 1’ or 1/4” equals 1’, transfer your correct measurements to graph paper. Start from the top left. Always be sure to double check your measurements.
- Don’t forget to pencil in plumbing and gas connections, ducts or radiators, outlets and light switches. (See above drawing for light switch and outlet symbols.)
Once the measurements are done and the graph paper drawn, you may want to make a few copies for your records. You may even want to sketch out some of your own ideas on the copies.
Budgeting and Construction
You have your wish list and measurements. Now it’s time to ask, “How much will this project cost?” Having a basic budget is a good idea for planning your Dream kitchen or any other project. The information below may be able to help. So that we may be able to service you better, please take the time to fill out the “Project Time and Budget” questionnaire and send it to the address below.
A Basic Budget
In today’s market there are many different types of cabinetry, options, countertop styles, and appliances available, each having a wide range of cost. Adding in the possible structural changes can make coming up with an exact price a bit difficult. A dishwasher, for example, can cost anywhere from $180 to $1,200 or more! Even kitchen designs in the same space can vary. One basic kitchen design may cost $8,000. After redesigning, using the same cabinetry, the new design may climb to more than $15,000.
However, it is possible to come up with a basic budget. A rule of thumb is that your total kitchen cost should not be less than 10% or more than 20% of the fair-market value of your home. That includes kitchen cabinetry, appliances, countertops, and labor.
Let’s say that the fair-market value of your home is about $200,000. You should spend between $20,000 and $40,000 on your kitchen for improvements. Keep in mind that if you plan to sell your home in the future and you spend less than 10%, then the kitchen may not meet a potential buyers’ expectations. If you go above 20%, then you’re less likely to make your money back when you sell your home. Kitchen remodeling has always maintained its position as a good home improvement investment. Sometimes the value goes up by as much as the cost of the remodeling, sometimes even more.
When Realtors were asked, “How often does an outdated kitchen or bath drive home buyers away?” Their response was: “It happens much too often!” As a former Realtor with over a million dollars in annual sales, Skip knows that a pleasing kitchen and bath do sell a home.
Building Your New Home
In new construction, many Builders will include a kitchen and bath cabinetry allowance, or budget, in the total price of their homes. Many will include a separate allowance or budget for countertops. Once upon a time, Builders used to include very low allowances or budgets. In a $200,000 home, for example, it wasn’t uncommon for a builder to allow their clients as little as $4,500 for their kitchen and bath cabinetry. Without researching, many clients didn’t realize that they had such a low allowance, or even know what their allowance was when they signed the contract. When it came time to pick out their new kitchen and bath cabinetry, they found they weren’t getting the Dream kitchen they wanted. Many had to go back to the bank to negotiate a new loan, causing lost construction time, headaches and frustration, and many times, more money.
Today, quality Builders know that their potential clients are more knowledgeable and more than ever are interested in better quality and better designs in their kitchen and baths. Most quality Builders today are now including larger allowances or budgets in their new home prices.
Quality Builders are usually very proud of their quality-built homes and the quality of the products they use, so don’t be afraid to inquire about the kitchen and bath cabinetry allowance or budget.
If you need help with a basic allowance or budget, SE Kitchens & Baths with your plans or blueprint (available through your contractor or architect), will be able to design a basic layout to help you come up with a ballpark figure.
Cost Factors
The products and materials you choose will have the greatest impact on the price of your new kitchen. Cabinets usually account for more than half the cost. Installation and labor costs (which can vary) will account for the next biggest piece, followed by the cost of appliances, countertops, and other accessories.
- Cabinetry comes in three varieties: stock, semi-custom, and custom.
- Stock cabinetry is manufactured in standard sizes and a limited number of styles. (Stock cabinets are usually the least expensive version of cabinetry.)
- Semi-custom would be second, where more options, finishes, and door styles are available than in stock cabinetry
- Since custom cabinetry is built to precise specifications and measurements and offers the most options in materials and design, custom cabinetry is usually the most expensive. Even though custom cabinets may be a little more expensive, don’t be afraid to look into them. Sometimes custom cabinetry may be able to save you labor charges. For example: Islands are usually put together by the custom cabinetmaker, whereas, stock or semi-custom cabinetry islands are usually put together onsite by the installer.
- Your cabinets door style will have the most impact on your Dream kitchen. They come in a variety of quality and prices.
- The least expensive door style is a veneer recessed panel door with a solid flat drawer front. The more expensive is solid center raised panel door style.
- Remember, when choosing a door and drawer style, the more intricate in detail, the more it probably will cost.
- Cabinetry finishes can also affect the cost. Standard finishes are usually included in the price of the cabinetry. Optional painted and premium finishes usually have an “upgrade” charge.
- Wood species comes in different varieties and can have an affect on the cost. Apples to apples, a cherry wood is usually more expensive than oak.
- Countertops are available in a variety of surfaces. The least expensive is the laminate top. There are also the more expensive solid surface and granite tops.
- Appliances vary in cost. A standard refrigerator can cost as little as $500 where as a built-in style, commercial grade refrigerator can range in the thousands! A standard range can cost as little as $350, whereas a commercial grade style range can cost $2,000 or more. A wall oven and cook top will cost more than a freestanding range. It’s a good idea to set up an appointment with a local appliance dealer who will be able to help you with your appliance needs.
- Even when you’ve received a firm bid from your contractor, costs can rise due to unforeseen conditions or changes. This includes unknown structural, electrical, or plumbing problems that are discovered during demolition. These can add time and cost. Be prepared.
Keeping Costs Down
There are a few things that you can do to help keep the cost down. You will, however, have to be ready to make a few compromises here and there.
- If you’re a do-it yourselfer, you can:
- Tear out the old cabinets.
- Take up the old vinyl flooring.
- Handle the trash removal during construction.
- Do the painting or wallpapering.
- Remove old sheetrock.
- Install the insulation.
- Always remember to look for professional help in:
- Plumbing and electrical work.
- Appliance hookups.
- Installing your new cabinets.
- Other ideas:
- Reuse your existing appliances.
- Forego ceramic tile or solid surfaces and use laminate countertops.
- Hold off on the architectural details and other accents until you’ve chosen and paid for the Less optional features, such as appliances. You can add the special touches later.
- Distinguish between your needs and wants.
- If your appliances and cabinets are in good working order and condition, you may be able to Sell or donate them, saving contractor removal expense.
Nothing pushes up the cost of a project faster than last minute changes to the original plans. With careful planning using the information available in this Web site, and working with SE Kitchens & Baths you will be able to comfortably complete your new Dream kitchen, or any other room in your home without having to make any unnecessary changes.
If pricing is important, keep the quality over quantity of your cabinetry important. Remember the old saying, “You get what you pay for.” It’s been known to have clients replace lower quality cabinetry they have purchased in less than five years. Where did they save?
Put your remodeling or new construction dollars into what’s important to you. If you’ve always wanted a raised-panel cherry cabinetry and a cook top with a double-wall oven, splurge on those items and try to save in other areas.
SE Kitchens & Baths has available a wide range of cabinetry in different styles, features and prices that will fit into any budget. Links are available in the “Products” area on this Web site to explore the quality cabinetry available.
Planning – Your Lifestyle
Congratulations! You’re getting ready to plan a new kitchen! You may have been thinking about your dream kitchen for some time. SE Kitchens & Baths can help you achieve your dream. A couple of things to remember… Relax and enjoy yourself! Creating the kitchen of your dreams is a very rewarding accomplishment! You and your family will enjoy the time and effort you put into planning for years to come!
Whether your project is remodeling or building your dream home, SE Kitchens & Baths created the guides and questionnaires below to help you through the process of planning from scratch to finish. Please take the time to print and fill out each questionnaire and send or fax to the address below. With the information provided, SE Kitchens & Baths will be able to design a beautiful and functional kitchen that will meet the taste and style you and your family will enjoy for years to come.
Planning – Your Kitchen Design – Wish List
Your family at one time or another will be using your future dream kitchen. Get the family together to help in the planning. There may be a lot of questions to talk about, but it’s better to be thorough than to make mistakes, or forget the feature you’ve always wanted in your Dream kitchen. Don’t forget to post the wish list for the last minute ideas your family may have.
Planning – Understanding The Work Triangle
For every kitchen, there must be three primary work centers… A Sink, Range and Refrigerator. In the 1950s, the University of Illinois Small Homes Council developed a method to evaluate the efficiency of a kitchen plan. A line is drawn from the center of the sink to the center of the range/cook top to the center of the refrigerator and then back to the sink. These three lines, called legs, create “The Work Triangle”.
- Each leg of the triangle should be between 4’ (121.92cm) and 9’ (274.32cm) long.
- The total of all three legs should be less than or equal to 26’ (792.48cm).
- Family traffic patterns should not interfere with the work triangle.
- An island or peninsula should not intersect any one leg by more than 12”.
Since the 1950s the work triangle and kitchen planning standards have become more flexible to accept more appliances, multiple cooks, and additional kitchen activities such as computer and entertainment centers. It’s not unusual to change the triangle into a rectangle or create two triangles. Today the triangle is between the refrigerator, primary food prep sink and primary cooking surface.
Basic Kitchen Layouts
Single Wall Kitchen
A single-wall kitchen is usually found in small apartments or efficiency units. This is the least efficient kitchen plan.

Corridor/Gallery
The corridor or galley kitchen for one cook can create an efficient work triangle. Unfortunately, family traffic can cross the path of the cook’s work triangle.

U-Shaped
The U-shaped kitchen has always been considered the most efficient plan. The cook is surrounded by three sides with an abundance of countertop and storage space. Family traffic is directed around the area.

L-Shaped
The L-shaped kitchen spreads out the work area and gives the cook a generous amount of countertop space and flexibility in placing appliances. Adding an island can give all the benefits of a U-shaped kitchen.

How To Prepare For Construction
Before you’ll be able to enjoy the beauty and features of your new Dream kitchen, you’ll have to consider planning for the remodeling or construction project . Put aside unrealistic expectations. People, homes, walls, floors, kitchens, etc. are not perfect. It’s a stressful time, things can and probably will happen. The best way to avoid any situation is to prepare yourself and your family for the upcoming challenge. Communication and flexibility are the best tools for everyone.
Here Are Some Helpful Ideas
- You’ll need your calendar and different color crayons or markers to keep scheduled dates.
- Firm up the start and completion date with SE Kitchens & Baths or your contractor. A complete remodeling or construction phase can take anywhere from two weeks to one or more months depending on how much detail is involved and SE Kitchens & Baths or your contractor’s schedule
- SE Kitchens & Baths will coordinate a delivery date with you or your contractor. Delivery dates will affect the remodeling or construction timeline. Most contractors prefer to start a job after all the products, materials and appliances are on-site. Plan ahead!
- Make sure that you allow enough time for custom orders and items with long lead times.
- SE Kitchens & Baths will coordinate the countertops with the installation of the base cabinets. Countertops are usually fabricated after the base cabinets are installed. Be prepared for a two to six week lead-time before your countertop will be installed
- All cabinetry and countertops ordered through SE Kitchens & Baths will include a lead-time.
- Before everything arrives, create a secure and safe place for storage and tools and a work area for SE Kitchens & Baths or your contractor.
- Designate which restroom and phone can be used by the workers and which areas are off limits.
- Don’t assume that the professionals know what’s on your mind or that they are perfect. Keep on top of the details and ask questions.
- In the weeks before the work begins, you may want to put together a list of all the restaurants you’ve always wanted to try, and a list of the restaurants that will deliver. Look in the paper for coupons or discounts at local restaurants. Maybe even purchase an Entertainment Book. It will have a lot of savings.
- Set up a temporary kitchen. Your old cabinets, countertop, refrigerator, table and chairs, microwave, coffeemaker and toaster oven can be used in your basement or another area in your home. (Try to keep your temporary kitchen close to a “water source” or bring in bottled water.) You may have to do dishes in another sink or bathtub for awhile.
- Before you tear out your old kitchen, spend some time preparing future microwavable meals that can be stored in the freezer.
- Use paper plates, napkins and disposable utensils. Turn dinners into a picnic!
- Keep the basics handy, such as: can opener, bottle opener, sharp knives, microwavable dishes, butter, salt, pepper, garbage bags, cleaning supplies and dish towels.
- If you have pets, you may want to find another area in the home where they will be kept safely away from the construction area. If an area isn’t available, you may want to ask friends, relatives or neighbors for their help.
- Dust … it’s inevitable! Cover your fish tank (if you have one), electrical equipment and furnishings that are in close proximity to the work area.
- Pack everything you won’t need into boxes.
- Make sure doorways and any other openings are sealed to adjoining rooms prior to demolition and construction.
- Construction is finally finished and SE Kitchens & Baths or your contractor does the final cleanup.
- Your final cleanup of your new kitchen. Congratulations – Yeah!!!
